前回のPhotoAppLinkに対応してみた!その1(画像送信) | エンジニア開発記の続きです
画像受け取り
画像を受け取るには
- URLスキームを設定する
- 画像受け取るコードをかく
- テスト用にいろいろがんばる
という結構めんどくさい手順があります。
URLスキームを設定する
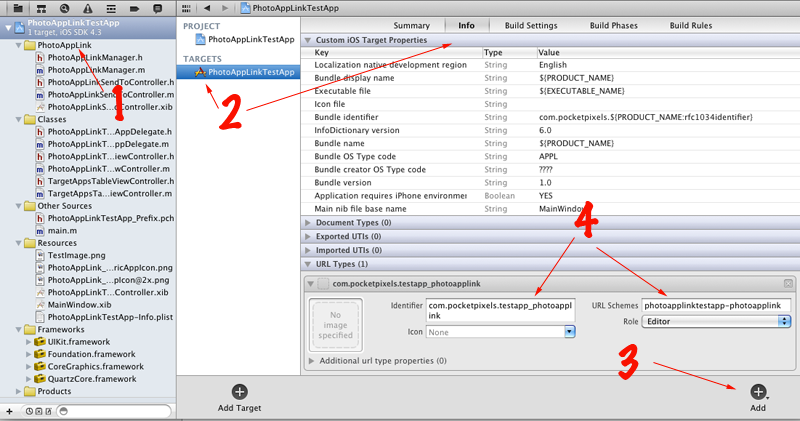
 (画像:pocketpixels/PhotoAppLink - GitHubより)
- プロジェクトをクリック→infoタブを選択し、設定を開く
- 右下のAdd→Add URL TypeでURL Typeを追加する
- 追加されたURL Typeをの設定をする
- Identifierはユニークなものを設定(AppのbundleIdentifier + photoapplinkなど)
- URL schemeは後ろが-photoapplinkについれば何でもOK(例:appname-photoapplink)
- IconとRoleの部分は無視してOK
画像受け取るコードをかく
これはほとんど企画元にあるサンプルがそのまま使えます。 ApplicationDelegateに以下を追加するだけです。
// Handle the URL that this app was invoked with via its custom URL scheme. // This method is called by the different UIApplicationDelegate methods below. - (BOOL)handleURL:(NSURL *)url { // Retrieve the image that was passed along from the previous app. UIImage \*image = [[PALManager sharedPALManager] popPassedInImage]; if (image != nil) { // TODO: Handle the passed in image as appropriate // Maybe something like self.mainView.image = image; // It really depends on your app... return YES; } return NO; } - (BOOL)application:(UIApplication \*)application didFinishLaunchingWithOptions:(NSDictionary *)launchOptions { // basic app setup [window addSubview:navigationController.view]; [window makeKeyAndVisible]; NSURL* launchURL = [launchOptions objectForKey:UIApplicationLaunchOptionsURLKey]; if (launchURL != nil) { // In iOS4 and later application:handleOpenURL: or application:openURL:sourceApplication:annotation // are invoked after this method returns. // However in iOS3 this does not happen, so we have to call our URL handler manually here. if ([[[UIDevice currentDevice] systemVersion] floatValue] < 4.0f) { return [self handleURL:launchURL]; } } else { // normal launch from Springboard // TODO: proceed with your normal app startup } return YES; } // This method will be called on iOS 4.2 or later when the app is invoked via its custom URL scheme // If the app was not running already, application:didFinishLaunchingWithOptions: will have been called before - (BOOL)application:(UIApplication *)application openURL:(NSURL *)url sourceApplication:(NSString *)sourceApplication annotation:(id)annotation { return [self handleURL:url]; } // This method will be called for iOS versions 4.0 and 4.1 when the app is invoked via its custom URL scheme // If the app was not running already, application:didFinishLaunchingWithOptions: will have been called before - (BOOL)application:(UIApplication *)application handleOpenURL:(NSURL *)url { return [self handleURL:url]; }
注意点としては
- 当たり前だが、画像を受け取ったあとの処理をそれぞれのアプリに合わせて書く
- application:didFinishLaunchingWithOptions:はデフォルトで書かれているので、整合性が合うように適当に合わせる。
というところです。 とくに画像を受け取った時の処理は、アプリがどんな状態で画像を受け取っても整合性が合うようにしないといけないので、アプリ設計時から気をつけていないと難しいかもしれません。
テスト用にいろいろがんばる
作ったらテストをするわけですが、アプリ連携のテストをするためには送信アプリ、受信アプリの2つが必要です。 今回はアプリ連携はソースをDLしたときにくっついてきたTestAppで行います。
- アプリ情報を書く ソースにくっついてきたphotoapplink_debug.plistをxcodeで開き、書いてある他のアプリの情報を参考にしながら自分のアプリの情報を追加します。 指定可能キーとその概要はこんなかんじです。
- name: アプリ名
- description: アプリの説明
- appleID: アプリID。iTunesConnectから見れます。
- bundleID: info.plistで指定しているBundle identifier
- canReceive: アプリが画像を受け取れるかどうか
- canSend: アプリが画像を送れるかどうか
- liveOnAppStore: すでにリリース済みのアプリがPhotoAppLinkに対応しているかどうか
- freeApp: 無料アプリかどうか
- platform: 対応デバイス。“iPhone”, “iPad” または “universal”で指定する。
- scheme: 上の「URLスキームを設定する」で設定したURLスキーム
- thumbnailURL: 57x57のアイコンのURL
- thumbnail2xURL: 114x114のアイコンのURL
- インターネット上にphotoapplink_debug.plistを上げる Dropboxの一般公開機能がお勧めです。
- TestAppを開き、PALConfig.hを編集する。
#define DEBUG_PLIST_URL photoapplink_debug.plistのアドレス
これで、TestAppからアプリに画像が送れるようになります。 送信と受信の両方に対応していれば、自作アプリ→TestApp→自作アプリと行き来ができて結構楽しいです 次回、アプリがリリースされてたら、企画元とのメールのやりとりについて書きます!